|
|
 |
|
|
|
Andrew Wright and Dave Ballard have both graciously allowed me to add this image and others of a full scratch build "ICARUS". Andrew built this model for his friend Dave. Dave found the link to this site and in turn, sent not only the original sketches that he gave to Andrew from which to design and build the model, but also sent in several 'completed' pictures of this wonderful ship modeled in computer background aided flight. Click the ship picture above to go to the page with all the other pictures and sketches on it. This model is proudly displayed on the POTA site above under "fan art". You'll notice the traditional "ICARUS" command module in the front (where the stripes are) and Andrew and Dave have added a 'space / warp drive' section to the rear, something we don't see in the movie, but like many fans, we all speculate about when it comes to what the 'rest' of the "ICARUS" looked like. Here is their take on the problem and one possible solution to how the "ICARUS" gets around the galaxy.
Andrew is an incredible model builder, please visit his site, ARTIFEX CREATIONS to see his other outstanding projects and models. Sadly, the "ICARUS" pictured here is not for sale, and there are no plans to mass produce this kit. Like many labors of love, this is a one-off hand built model. By the way, Andrew says that looks are deceiving; this model is over two feet long! That's bigger than even the Monsters In Motion kit!
Dave Ballard has sent me the context of an interview done in the modeling magazine DRONE. Check out how and why this model was built here. For those of you who are interested, DRONE looks to be quite a nice rag. I've already sent the contact email to see if I can swing a subscription to be carried to this side of the pond. I'll let you know if they do international orders, or at least ship to poor yanks over in the states (like me). There is a very serious shortage of good modeling magazines out there, and face it, as good as Fine Scale Modeler is, or Tamayia, the sci-fi content of those two rags is few and far between. Support DRONE if you can! It's about all you have out there that has serious content on our craft and hobby!
Thanks, Andrew and Dave, for your time and patience discussing this model and for allowing me to let others see this incredible model who might not be able to see it otherwise. I *really* like the shape of this model as it spreads backwards, and I may incorporate a similar design into my own design, giving the basic "ICARUS" *more* of a command capsule area to dock onto the ARROW IV lifting body.
We shall see... this model stirs my imagination. Dave has also submitted the design plans for this version of the "Icarus". The file is pretty large, and as such, occupies its own page. Find it HERE.
Dave Ballard has been a fan of the "ICARUS" for many years now. His work in the POTA comic scene is also well known (and parts are featured on this site under the ARTWORK section). Along with the pictures and the sketches, Dave also submitted a piece of original art work entitled "LANDING ZONE", find it in the ANSA SPACE FLIGHT GALLERY.
As for the story of the ARTIFEX CREATIONS "Icarus" ... what better person to tell the story than the two main people involved.
STARSHIP MINE
BY DAVE BALLARD
Of all the ships in the history of the Science fiction movie, few are as little seen or as
shrouded in mystery as that which carried four astronauts, two thousand years through
time, to crash land on a future earth that in their absence had become a Planet of Apes.
From the very beginning of the production, budget would always be a huge problem but in
this instance 'necessity was the Mother of invention' and the restrictions led to a
creative wave of positive inspiration.
The starship from Planet of the Apes is never seen in it"s entirety, The opening
prologue, set in deep space shows plenty of interior detail but the stars themselves are
only ever seen through the windows. The dramatic crash landing, originally planned as an
expensive series of shots involving miniature photography was ultimately shot subjectively
- from the spaceships point of view - Which gave the sequence a startling originality.
When the ship hits the water our first view of this future earth is once again through
it"s windows and only then do we get our first clear indication of what the ship, or
at least part of it, actually looks like. What we see is a dart shaped, nose section of a
small and sleek spacecraft but very little else. A brass or maybe gold nose cone, two
little winglets, dark, opaque triangular windows and the beginnings of two major wings.
The water hints at more lying beneath the waves but what this looks like we will never
know.
The ship was designed by William Creber who also designed the distinctive look of Ape
city. Creber says.:
"We wanted something that wasn’t just a capsule. So I looked around and noticed
this sort of "para glider" idea which seemed a bit more futuristic. We did some
sketches of how it would look floating and both the Director and Producer liked them so we
just did it. We didn’t spend a lot of time designing it because there just
wasn't the time to get it thought out. We just tried to emulate what NASA was working
on back then.
We implied that there would be a door at the rear and that there might be rockets and at
one point we were going to add a heat shield but, since we knew that it was never going to
be seen the rear just became unimportant."
The nose section re-appeared in the sequel "Beneath the planet of the Apes",
this time with extra dressings. A burnt out skeletal shape is all that remains of the rear
of this second starship (Actually the first prop re-used) The contours are remarkably
similar to the shape of the present day space shuttle, a design that was, at that time,
still in NASA"s future. A long burnt out "tube" can be made out running
almost the complete length of the ship giving a clue to the engine structure.
A re-designed full size prop was used for "Escape from the Planet of the apes"
which magically now includes a hatch just behind one of the windows. This prop is actually
different from that used in the first and second movies, Curiously there is no sign of any
type of propulsion system whatsoever so the ship in escape is merely a recovery vehicle.
On the WWW some POTA conspiracy buffs have put forward the notion that at some point a
third ship must have landed on the POTA and it is this that the three apes discover and
use to travel back in time. The truth is the prop is merely a story telling device to get
us from point A to point B, and was used in an age when movies were never subject to the
scrutiny of a VCR or DVD freeze frame.
The prop appears one last time in the pilot of the TV show. The hatch is still present and
this time barely glimpsed engines have been added to the rear of the ship. It is still
however remarkably small for a long, deep space mission with a crew of three.
For many years I"ve had a particular fascination with the sleek simple contours of
this mystery Starship. Probably because it was the first spaceship I ever took note of
(except maybe the Irwin Allen TV ships) I always knew there had to be a lot more beneath
the waves, a suspicion given some validity when an engineer pointed out that at least
twice as much mass again would be needed to get the nose section to sit at that 15-30
degree angle while sinking. The official studio blueprints show a token attempt at some
"Apollo" style rockets but this clunky, stubby rear seemed so at odds with the
graceful front of the craft I could never accept it.
After 20 odd years of vaguely thinking about it I decided I would at last attempt to
design a complete ship that satisfied my "gut" feelings. I sat down a began for
the first time to seriously think about what type of features the ship would have needed
to fulfil its required functions. Using some dialogue and obvious facts from the movie I
made a few notes and offered my own solutions to some basic questions.
1. The ship was designed to land and take off again. This would require standard "jet
engines" for atmospheric flight, Landing and take offs would best be served by
Vertical Take Off technology similar to the Harrier jet fighter. It would probably have
landing struts (like for instance the Nostromo) rather than shuttle type wheels and
undercarriage which would require a runway.
2. The ship should be at least twice the length as that which we see in the movie.
This justifies the angle it sits at when sinking, it would allow for required storage and
quarters as well as the space needed for some kind of combustion to take place within the
engines without incinerating the crew.
3. The propulsion system is capable of reaching near light speed, this would require a
currently unknown technology which for the sake of convenience I referred to as a
"Warp" or "Hyper" drive. The ship would need to be as aero dynamic as
possible for atmospheric flight.
I then began to sketch. I scanned and printed out copies of the front of the ship and
followed the lines, experimenting with pencil and erasers rather than plasticard and clay.
Slowly the ship in my subconscious took shape, ideas were tweaked and enhanced, whenever I
found myself cluttering things up I started again... Less is more, I thought.
The part that gave me the most trouble was what I would come to know as the "Hasslien
Drive". The shape of the rear of the ship was now pretty clear to me. Where the
engines lay had been nailed. What they looked like was something else entirely. Eventually
I designed something based upon the warp nacelles of a Federation Starship. On paper it
looked pretty cool. I had my design, I now did what any sane person would do under the
circumstances... I looked for someone to build it for me.
As luck would have it my path had just crossed with that of Andrew Wright, when I
discovered Andrew he was living a miserable existence as a sex slave to Milla Jovovitch, a
fate I barely managed to save him from. So grateful was he that he offered to build my
ship for almost nothing. Quite how he went about this is an article in itself...
Note... some of that previous paragraph was actually true!
STARSHIP MINE: PART TWO
BY ANDREW WRIGHT
When someone suggested the idea of
making an Icarus model and showed me a couple of pictures, I said "sure, it's a
simple shape, it'll take no time at all".
He also had his own designs on the back of the craft, his logic being [if any of you have
seen the film, this will make sense] that in order for the nose to be pointing up out of
the water, there needs to be a large amount below the surface.
He supplied me with a selection of photographs of the ship in model and full size prop
form, and a few sketches of what he would like the back to look like.
He wanted the ship to be 2ft long [originally 3ft,but I suggested this will need a large
display area so he opted for a smaller size]. I started by working out how big to make the
existing part of the ship, using his sketches to work out where the original ship ended
and his new rear began. I then worked out the scale for the photographs, and used them to
build up plans on A3 paper. This went well for about 45 minutes until I got around to the
back of the craft. What frequently happens is: What works in a sketch doesn't work
out logically when you attempt to work it out in plan form [top bottom, side, rear etc].
He wanted the back to be similar to the front of the "Spindrift," (from
TV's "Land of the Giants") but it wasn't joining on all that well. The
main trouble being that the front was quite angular, and he wanted the back to be quite
curvy. I left this open, as it wouldn't affect my getting started and you frequently
find that working in three dimensions makes it a lot easier to realize what you have in
mind.
The basic hull shape was carved out of 80kg/m3 polyurethane foam. This is very easy to
work, using saws, knifes, chisels and sandpaper etc, to give nice compound curve shapes
and the like. I started working on the cone shape first. I drew a centre line and marked
out the arrow shape, and cut that out with a jigsaw. I then marked out the ellipse on the
end of the foam, and cut the corners off. I used a long sander to shape it up, with 40
grit sandpaper. Once this was done, it was covered in one layer of fibreglass tissue. (you
can buy small amounts of this at car repair shops, although at a premium). The tissue is
simply cut to size, then wet out with laminating resin on the wet out foam, and allowed to
solidify.
I couldn't do this all in one go, so the top and bottom were done separately. When
this had hardened overnight, I used 100 grit sand paper on the long sander, to smooth it
off and leave a fairly good cone. There will always be the odd pinhole and low bits, so
filler was smeared on and sanded smooth when ready.
The window area was carved out, and deliberately made too low, so the details could be
added later. I then marked out the side triangular sections, and cut them out of foam,
stuck them on the sides and covered them in tissue also. The craft was now identifiable as
the ship in question and the time had now come to deal with the back.
I started on this by shaping the back of the cone off, and start bringing it back in at
the rear. This was a matter of toying with it until it looked right. It was a case of
"loose a bit here, add a bit there", etc. until it was working ok.
Inside the back, Dave wanted a warp nacelle kind of thing, so the inside was hollowed out
and room for it to be added later was allowed for. He wanted vents/grills at the ends of
the side triangular wings, but for these to work, the back of the main hull needed to be
sorted out.
I sanded the back until it fitted in with what [I hope] he had in mind, and then smoothed
the inner surface with filler. The actual nacelle [which he wanted translucent greeny
blue] was made first in foam to rough the shape, then filler smoothed over and sanded and
a mould made. I was going to cast it in pigmented clear polyester resin and I remembered
having some vinamould lying around. As clear polyester has little wax in it, so
it'll
bond well to items placed in it [like paper weights] it will not cure to a tack free
finish on the surface in silicone rubber moulds, as they are gas porous. Vinyl compounds
do not suffer this problem, but are pretty useless for most other things. I'd
recently had a big clear out, and after an hour of searching, could I find it? Could I
bugger, I had binned it. The motto here being that there's nothing wrong with
hoarding, as it"ll come in handy at a later date!
I only needed to cast one or two versions, so I made a plaster mould, by coating the dome
in a thin layer of Vaseline, then putting a small wooden box around it, leaving a quarter
of an inch or more gap, and poured the plaster in from one corner, and let it flow up.
Plaster of Paris is not very good at most molding jobs, so you either want an alpha
plaster, or a dental stone, which are both very hard. Once hardened, the plaster expands
slightly to let the "plug" drop out easily.
Next I dried out the mould thoroughly in the oven, then gave it a spray coat of a
polyurethane varnish to seal it, then gave it two coats of PVA release agent. I then mixed
up 150g of clear casting resin, and put in the smallest touch of a pigment mix I had
concocted and mixed in 1% catalyst. I let this stand for ten minutes, as the air will rise
out, then you can pour it in your mould. As polyester [like most plastics] contracts when
curing, it simply dropped out of the mould when ready.
This was then rubbed down with 600grit wet and dry, before being buffed up with a cloth
mop and compound.
I now had the form to make the socket at the back. I covered the nacelle with masking
tape, then put filler in the recess I had left and pushed it in. The idea being when it
was green [semi cured] I would pull it out, to reveal a tight socket I could clean up, and
stick the back in when all the rest was finished. Good idea, the only trouble being, the
thing was stuck like the proverbial shit to a blanket. I pulled all I dare, but it
wasn't coming out, unless some of the back came with it. So I reasoned if I
couldn't get it out with brute force, it isn't going to drop out on its own, so
I left it in.
With the back done, I finished off the side part's rears, by shaping them in, and
adding a mesh material I had knocking about that I thought might look alright.
I now finished the front by adding sections of a grate styrene sheet I had left over from
building my tie fighter's solar panels. I stuck these with epoxy, and then went
around the edge with milliput. When this was hard over night, I filed and sanded it
smooth, and cut in the escape hatches using a sharp knife, and needle files to straighten
then up.
The last thing to do was make a socket for the stand, which was made from a steel rod and
plate. The hole's lining in the bottom of the ship was a piece of brass tube, which I
then hollowed out from the appropriate piece of hull, and stuck in with filler.
The next step was to coat it with primer filler.... Several cans later, This was left to
harden over night, then rubbed down with 6oo grit wet and dry paper-wet. This smoothes
everything off nicely, but also shows all the defects, so you now find yourself adding a
bit of filler there and sanding a bit here, etc.
It was now ready to paint, and here came the fun! I had just come off making my TIE
interceptors, where everything that could go wrong did go wrong. This had tested my
patience like nothing else I've made. But that was all over, and this was a clean
start... Or so I thought.
The hull's colour is white, and where I work we use cans of white cellulose paint.
I'll use one of them I thought. Bad idea! Some cans of spray paint give a better
finish than others leaving orange peel textures and this is what I was left with, so I
used 1200 wet and dry to smooth it out and then polished it up with T-Cut.
Bad idea 2... While this smoothed it out okay, some bits of muck had somehow got in, and
now left small black dots in a few places. This was no good, so I thought I'd give it
a light coat of Humbrol Enamel through the airbrush, just enough to cover the
imperfections.
Oh dear.
The thinner I'd been using was for cellulose, the kind I've used for quite a
while with enamel paint caused a rather major problem. Now I don't know if they have
changed their formula, or I had more thinners in than on previous occasions, but a
reaction occurred and caused the paint to wrinkle up.
All my pent up frustrations could be concealed no longer, as I kicked the workshop door a
few times, and stormed across the backyard using rather colourful language. All I can say
is, if any of my neighbors were outside at the time, I apologize
unreservedly.
When I had calmed down enough to go back, I decided to strip the paint off, as I
didn't want any more paint reaction worries. I used the thinners and a toothbrush
[old one by the way] to soak and scrub the paint off. Now this is no problem on the
fiberglass sections, as it is very durable, but I encountered a problem at the front. The
paint build up on the louvered front needed to come off, as otherwise another coat of
paint would blend out the detail. I scraped this off as best I could, as solvents would
dissolve the styrene, but I did damage the regular pattern, so I tried to file it back in.
Mmmmm, looked okay, but a bit rough. As I didn't have anymore sheet to do it again
[although I have found some more knocking about?? always the way] I would have to leave
it, or order some more, and as there is a minimum order value, and you need to buy a large
sheet, I rightly or wrongly left it.
I now primed it again, rubbed it down again, and this time sprayed it with a Humbrol
aerosol spray I had seen, while picking up more enamel paint and it's recommended
thinners! I gave this a quick test, and it gave a nice smooth finish, so I went ahead and
sprayed it again. This was much better.
The next day I masked up the red and blue stripes around the nose cone and the central
hull, and lightly airbrushed the paint on. Another problem! The masking tape I was using
was not leaving a clean edge but rather rough, so I re-masked them and did them again.
This looked fine, until I noticed that when you tilted the ship and looked down it"s
length, you could see slight overspray. On dirty models this doesn't matter, but this
needed to be totally clean. (In future I will mask the whole thing in question up.)
I used a little T-Cut to remove the over spray, but as the paint was not totally hard all
the way through, in some areas it left dirty marks. I used the aerosol again to touch
these bits up. The nose cone was masked up and sprayed with a mix of enamels to give a
brassy gold look.
Next were the window indents, which were airbrushed with khaki. I then gave the whole ship
a coat of satin so the whole thing had the same sheen.
Finally the radiator type bits at the back were airbrushed matt black.
Now I had promised that I'd be sending this off on the Monday and I wanted to keep my
word, but the varnish was taking it"s time to harden up, so I used an electric floor
heater to blow warm air at it... Another bad idea.
Although it wasn't all that hot, it made differing materials expand at different
rates, and a line emerged. That's all I needed! I sanded the defect out, and touched
the paint up again. The steel base was sprayed satin black, and that was it.
If you"re unsure how a paint is going to work, test it beforehand, don't just
jump in. I learned this the hard way [along with quite a few other things] and I
don't intend to repeat the same mistakes twice. Put it down to experience, and you
can get it right next time!
STARSHIP MINE: PART THREE
BY DAVE BALLARD
One morning, Mr Postie knocked upon my
door carrying the biggest box I'd ever seen. With trembling hand I signed my name,
thanked him and began to tear into the packaging. A glimpse of white caught my eye, I
ripped off the bubble wrap and there, laying on it's side was an actual three
dimensional model of The Icarus.
I lifted it out of the box and was surprised by it's lightness, something more than
compensated for by a heavy stand that almost put my back out. I reverently placed the
Starship on the stand, stood back and admired Andrews craftsmanship.
He had followed my designs to the letter and it was a huge relief to find that what seemed
to work in two dimensions looked just as good in three. It was strange seeing something
that had existed in my subconscious for so long now sitting there in front of me.
I'd
always known that this was how The Icarus ship was supposed to look, I just never knew
that I always knew it.
There were the windows, there was the hatch, there were the winglets with their little
maneuvering thrusters. There were the wings and the exhaust ports and there... right at
the back...? What the Fuc* was that!
Andrew had followed my design to the letter improving upon it where required but sadly,
the "Warp" bubble just didn't work. There was nothing wrong with the
execution, a translucent orb was what I'd asked for and a translucent orb was what
I'd got but it lacked... conviction.
I though about it and realized I'd been lazy and just hadn't thought it through.
Andrew graciously offered to re-do any parts I didn't like free of charge but before
I bothered him I wanted to try a few things out on my own. I put a call out to a number of
friends I'd made on the web asking for input. One Ape fan in particular - Mez Downes,
was very helpful and I discovered that she too had given The Icarus a lot more thought
than was probably healthy.
Here's what Mez had to say...
"I think you can discount hyper or warp-drives, or there would have been no need for
Taylor and his crew to go into stasis for the journey if they had such capabilities, and
the highly advanced technology required to make them feasible propulsion systems wasn't
reflected in the sequels.
You can also discount chemical rockets because they'd be depleted long before the ship
left our solar system.
What that leaves for interstellar travel is antimatter, fusion plasma propulsion, and
solid core nuclear fusion. Nix the first two for the same reason above -- out of line with
the technology timeline.
The last is the one I'd go with. Nuclear fusion engines are within easy reach. It just
takes some bright spark to figure out how to make a reactor chamber small enough to fit on
a ship the size of Taylor's and how to fuel it efficiently for a long duration
spaceflight."
Standard looking fuselage was the way to go, futuristic to be sure but they would still
have to be recognisable as such. The Icarus was about to become a Nuclear fusion powered
spacecraft.
On the morning of Good Friday one of the Satellite channels was showing "Lost in
Space" (the movie) and the engines on the new Jupiter 2 impressed me. Within 24 hours
I'd secured the plastic model kit but unfortunately although he engines would have
been convincing they were obviously too small.
Discouraged I decided to have a bit of a spring clean, clearing up and throwing out my
sons old and broken toys and came across an almost obliterated Star Wars Snowspeeder. The
back was intact and suddenly the new propulsion system for The Icarus was literally
sitting in my hands.
I emailed Andrew and he kindly advised me on the best way to go about removing the
existing warp bubble. Adding a somewhat sinister sounding "Good luck"
Very carefully, I followed his instructions and the resin "bubble" came out
without a hitch. The Snowspeeder engines were laid up against a now ragged hole at the
back of The Icarus and to my surprise and relief it was almost a perfect fit.
I made a few minor cosmetic changes and used a two part epoxy resin to secure the new
engines in place. Once dry I puttied around the edges blending in with the contours of the
ship. The whole assembly was sprayed matt black (including the inside of the recess at the
back of the ship, an area previously left white) which helped to hide any small
imperfections. Once everything was dry I drybrushed over the detail with gold. (It looked
more interesting than silver and not as bright)
Stunned by how easy the refit had been I once again studied the ship. It"s 97%
Andrews work and 3% my own but most importantly it was 100% what I'd always wanted.
There was one final finishing touch that would be the icing on the cake. For Christmas
some warped and twisted excuse for a human being bought my son a 6" POTA action
figure, no doubt hoping that on Christmas Morn the household would resemble the inside of
an abattoir once ownership rights had been established.
Although the action figure was quite unremarkable it was designed to stand upon a small
2" x 4" base which included the POTA logo in chrome relief. I shamefully stole
this base and glued it onto the one supplied by Andrew and it gave the whole thing a final
touch.
All that remains now is to fill up the bath and to see if it'll sink at the correct angle.
Dave B
PICTURES
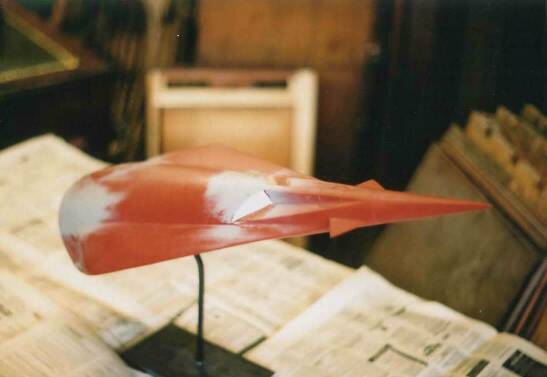
Preliminary model work
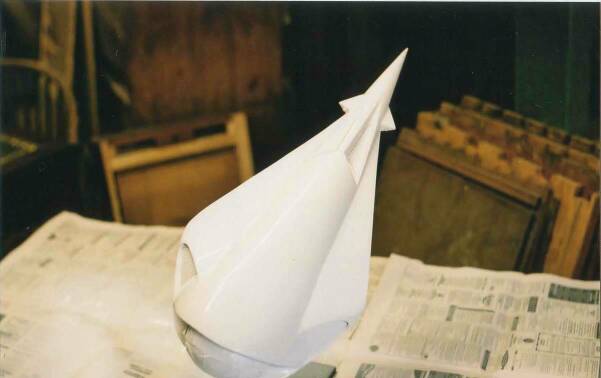
Model ready for detailing

A montage of the model creation process
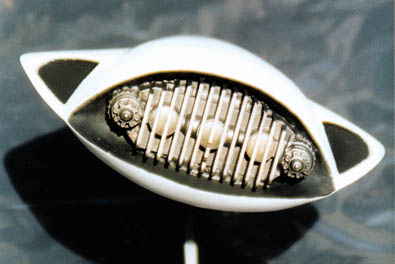
Closeup of rear 'engine' detail.
___________________________________________________________________________
PHOTOS OF THE "ICARUS" MODEL IN FLIGHT.
Model created by Andrew Wright. Model owned by Dave Ballard
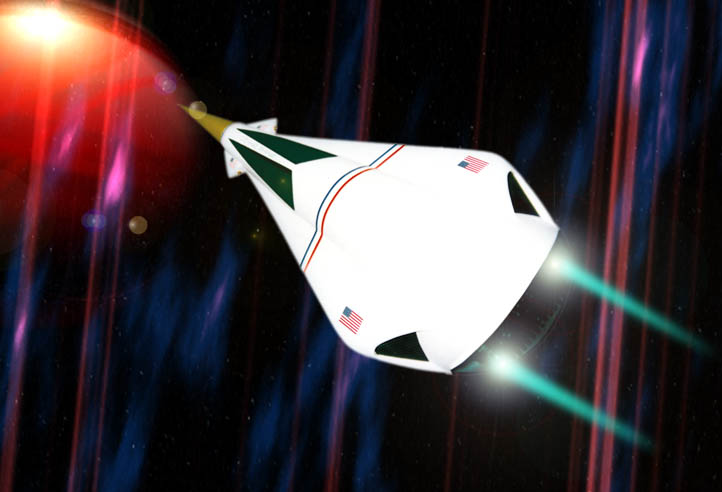
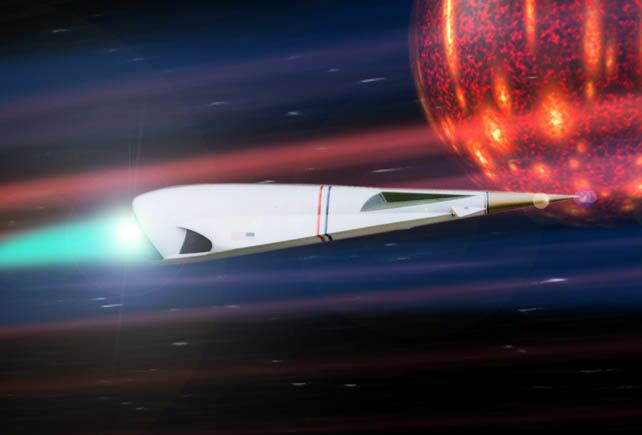
Approaching the speed of light, the crew in suspended animation...

The "Icarus" making reentry...
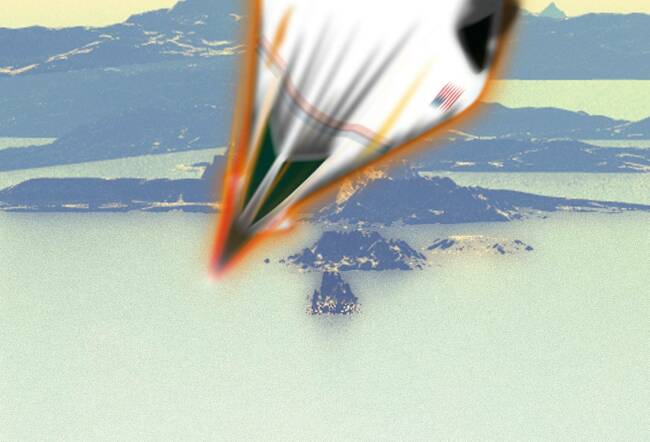
NEW PIC: The "Icarus" making reentry picture from Dave Ballard
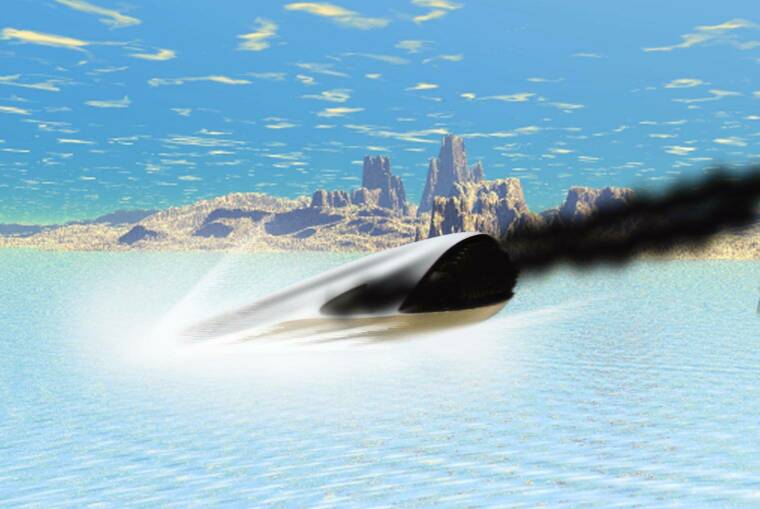
NEW PIC: The "Icarus" splashing down.

The original artwork sent in by Dave Ballard,
entitled "Landing Zone"
featured on the Space Flight Art Gallery
____________________________________________________________
Preliminary model sketches
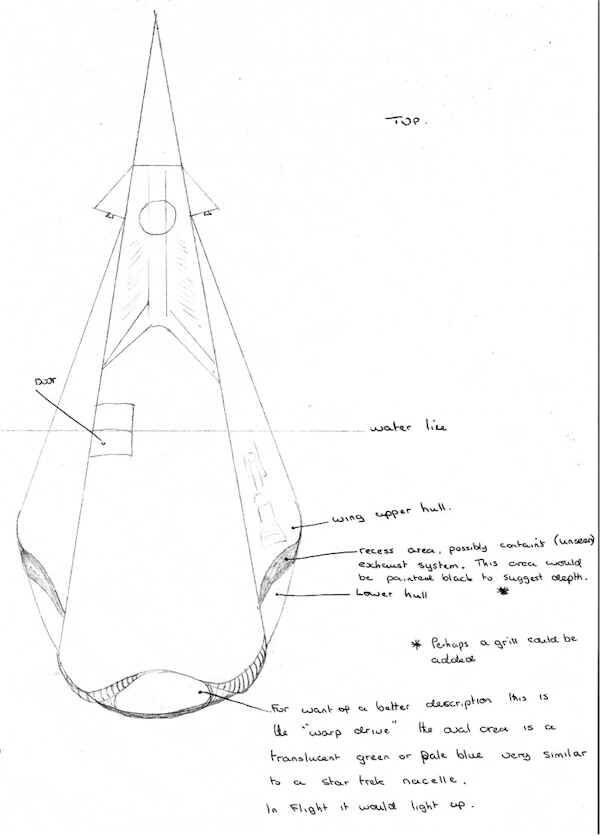
Preliminary design sketch submitted by Dave Ballard, top view.
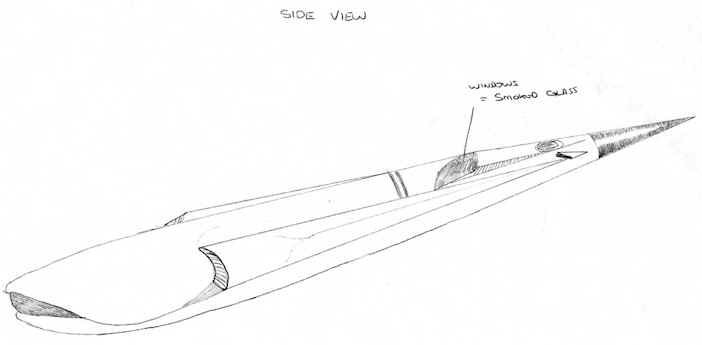
Preliminary design sketch submitted by Dave Ballard, side view.
Thanks to both Andrew Wright and Dave
Ballard for these incredible images
and for the chance to discuss this intricately detailed model.
